Advertisement

Level Up Your Car’s Shine Game: Essential Tips for Better Car Polishing

Introduction

When it comes to maintaining the appearance of your car, one aspect that can significantly enhance its overall look is car polishing. Not only does it bring a brilliant shine to your vehicle, but it also provides protection against environmental elements and increases its resale value. In this article, we will explore the essential tips and techniques for better car polishing, ensuring your car’s shine game is at its peak level.

Importance of Car Polishing

Car polishing is not just about achieving a glossy finish; it offers several benefits that go beyond aesthetics. Firstly, it helps protect your car’s paint from environmental damage, such as UV rays, acid rain, and pollutants. By creating a barrier on the paint surface, polishing acts as a shield against these harmful elements, preventing premature fading or oxidation.

Secondly, car polishing can significantly improve the resale value of your vehicle. Potential buyers are more likely to be attracted to a car that looks well-maintained and has a sleek, polished exterior. It gives the impression that the car has been cared for and is in good condition. Even your car is very sleek a da polisher can manage it without damaging your paint.

Choosing the Right Polishing Products

Before diving into the polishing process, it’s crucial to select the appropriate products for your car. Understanding the differences between polish, wax, and sealant is essential.

Polish is designed to remove imperfections and restore the paint’s shine. It contains abrasive particles that help smooth out scratches, swirl marks, and other blemishes. Wax, on the other hand, is a protective layer that provides a glossy finish and shields the paint from environmental damage. Sealant is a synthetic product that offers long-lasting protection and durability.

When choosing polishing products, consider your car’s paint type and condition. Different paints may require specific products, such as clear coat-safe polish for modern cars or products specifically formulated for older vehicles. Research reputable brands known for producing high-quality polishing products that deliver optimal results.

Preparing Your Car for Polishing

Proper preparation is key to achieving a flawless finish. Start by washing your car thoroughly to remove any dirt, dust, or debris that may cause scratches during the polishing process. Use a mild car wash soap, a soft sponge or microfiber cloth, and rinse with clean water.

After washing, inspect the paint for scratches, swirl marks, or other imperfections. If necessary, use a clay bar to remove embedded contaminants that regular washing cannot eliminate. It will leave the surface smooth and ready for polishing.

Additionally, consider masking off sensitive areas like rubber trim, plastic parts, and chrome accents to protect them from accidental polish splatter or damage during the polishing process.

Step-by-Step Car Polishing Guide

To achieve the best results, follow this step-by-step guide for car polishing:

  1. Start with a test spot: Choose a small, inconspicuous area on your car’s surface to test the polish. This allows you to assess its effectiveness and ensure it doesn’t cause any adverse reactions.
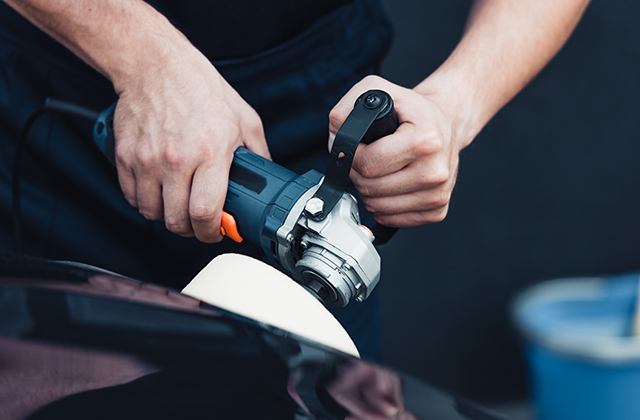
  2. Apply the polish: Put a small amount of polish onto an applicator pad. Begin working in a back-and-forth or circular motion, applying even pressure. Start with a low speed if using a machine polisher.
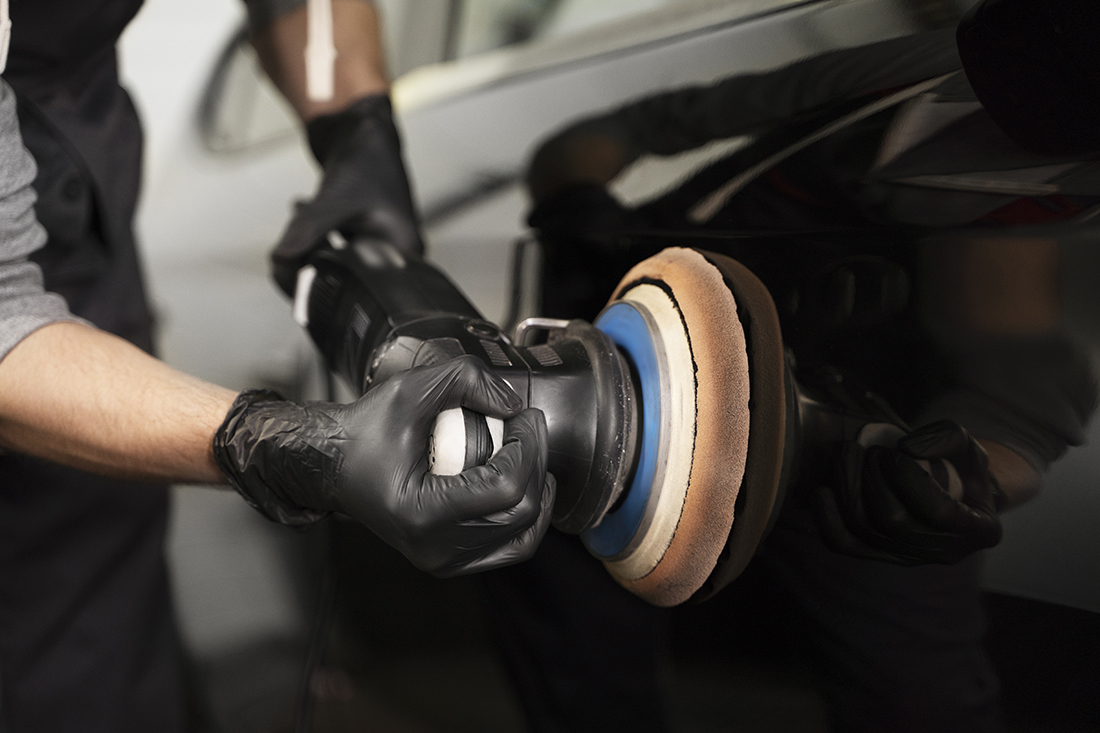
  3. Use a dual-action polisher: For larger areas, a dual-action polisher can make the process more efficient and effective. It provides better control and minimizes the risk of overheating or damaging the paint.
  4. Work in sections: Divide the car into manageable sections, such as the hood, roof, doors, and trunk. Focus on one section at a time to ensure thorough coverage and consistent results.
  5. Apply consistent pressure and speed: Whether using a machine polisher or hand application, maintain a steady pressure and speed. Avoid applying excessive pressure, as it can lead to uneven results or damage the paint.
  6. Check the progress: Periodically stop and inspect the area you’re working on. Look for improvements in the paint’s condition, such as the reduction of swirl marks or scratches. Make necessary adjustments if needed.
  7. Remove excess polish: Once you’re satisfied with the results, use a clean microfiber cloth to remove any excess polish. Wipe in a gentle, circular motion to ensure a streak-free finish.
  8. Inspect the finish: After removing the excess polish, take a close look at the polished area under different lighting conditions. Check for any remaining imperfections or areas that may require additional attention. If necessary, repeat the polishing process to achieve the desired results.

Tips for Achieving a Professional Finish

To take your car polishing skills to the next level and achieve a professional finish, consider the following tips:

  1. Properly maintain the polishing pads: Clean and condition your polishing pads regularly. Remove any residual polish or debris from previous uses to ensure optimal performance.
  2. Use different types of pads: Different pads offer varying levels of aggressiveness and are suitable for specific needs. Experiment with foam, microfiber, or wool pads to find the one that works best for your car’s paint type and condition.
  3. Gradually increase polishing aggressiveness: If you encounter stubborn imperfections or deeper scratches, start with a less aggressive polish and gradually increase the aggressiveness if needed. This approach helps minimize the risk of damaging the paint.
  4. Apply a sealant or wax: After polishing, apply a layer of sealant or wax to protect the newly polished surface. This provides an additional barrier against environmental elements and helps maintain the shine for a longer period.

Maintaining the Polished Look

To prolong the polished look of your car and keep it in pristine condition, follow these maintenance tips:

  1. Regular washing and drying: Wash your car regularly using a high-quality car wash soap and a soft sponge or microfiber cloth. This removes dirt, grime, and contaminants that can dull the shine.
  2. Use a quick detailer: For touch-ups between washes, use a quick detailer spray. It helps remove light dust or fingerprints and restores the shine instantly.
  3. Park in shaded areas: Whenever possible, park your car in shaded areas to minimize sun exposure. Prolonged exposure to direct sunlight can fade the paint and diminish the polished finish.
  4. Reapply wax or sealant: Over time, the protective layer of wax or sealant may wear off. Follow the manufacturer’s recommendations and reapply the product periodically to maintain optimal protection.

Common Mistakes to Avoid

To ensure a successful car polishing experience, avoid the following common mistakes:

  1. Applying too much pressure: Excessive pressure can lead to uneven polishing results and damage the paint. Apply gentle and consistent pressure throughout the process.
  2. Using excessive product: Using more polish than necessary won’t yield better results. Follow the instructions provided by the manufacturer and use the recommended amount for each section.
  3. Overlooking proper lighting: Adequate lighting is crucial for identifying imperfections and assessing the progress of the polishing. Perform the process in a well-lit area or use additional lighting if needed.
  4. Neglecting safety equipment: When using machine polishers, wear appropriate safety gear, such as safety glasses and gloves, to protect yourself from any potential hazards.
  5. Rushing through the process: Car polishing requires time and patience. Avoid rushing through the steps, as it may result in subpar results. Take your time to achieve a professional finish.

Conclusion

By following these essential tips and techniques, you can level up your car’s shine game through effective car polishing. Remember to choose the right products, prepare your car adequately, and follow a step-by-step process for optimal results. With regular maintenance and avoiding common mistakes, your car will maintain a beautiful and polished appearance for years to come.

Advertisement

Signwriters 101: The Basics of Signage Design and Installation

Signage plays a crucial role in attracting attention, conveying messages, and enhancing brand visibility. Effective signage design and installation require a combination of creativity, technical expertise, and an understanding of the target audience. Whether you’re a business owner, a marketer, or a designer, knowing the basics of signwriting can greatly contribute to the success of your signage endeavors. In this article, we’ll explore the fundamental concepts of signage design and installation, providing you with valuable insights to create impactful signage. A custom stickers Sydney is an easy way to promote an event or cause.

What is Signage Design?

Signage design refers to the process of creating visual elements such as symbols, graphics, and text that are used to communicate a specific message to a target audience. Whether it’s a storefront sign, a billboard, or directional signage, the design plays a crucial role in attracting attention, conveying information, and reinforcing brand identity.

Importance of Signage Design

Effective signage design can significantly impact a business’s success. It helps create a strong first impression, establishes brand recognition, and influences customer behavior. A well-designed sign should be visually appealing, easily readable, and convey the intended message clearly and concisely.

Elements of Effective Signage Design

Several elements contribute to the effectiveness of signage design. These include:

  1. Color and Contrast: The choice of colors should align with the brand identity and enhance readability. High contrast between the background and text improves visibility.
  2. Typography: Selecting appropriate fonts and ensuring legibility is essential. Typeface styles should match the overall brand personality.
  3. Images and Graphics: Incorporating relevant and high-quality images or graphics can help convey the message more effectively and engage the audience.
  4. Layout and Composition: Well-structured layouts guide the viewer’s attention and make the information easy to digest.
  5. Branding Elements: Incorporating consistent branding elements, such as logos, slogans, and brand colors, helps reinforce brand identity and increase brand recognition.

Types of Signage

Signage can be categorized into different types based on its location, purpose, and function. Understanding these types can help you choose the most suitable signage for your specific needs.

Outdoor Signage

Outdoor signage is designed to be placed outside buildings or in open spaces to attract attention and guide people to a specific location. Examples include storefront signs, billboards, banners, and vehicle wraps. Outdoor signage should be durable, weather-resistant, and highly visible to ensure maximum impact.

Indoor Signage

Indoor signage is used within buildings to provide information, direct visitors, or promote products and services. Examples include wall signs, floor graphics, menu boards, and point-of-purchase displays. Indoor signage should complement the overall interior design, be easily readable, and create a positive customer experience.

Wayfinding Signage

Wayfinding signage is specifically designed to guide people through complex environments such as airports, hospitals, or large facilities. These signs provide clear directions, maps, and instructions to help visitors navigate efficiently. Wayfinding signage should be strategically placed, easy to understand, and use intuitive symbols and arrows.

Signage Design Process

Creating effective signage involves a systematic design process that ensures the final result meets the client’s requirements and effectively communicates the intended message. The following steps outline the typical signage design process:

Understanding the Client’s Needs

The first step in the design process is to thoroughly understand the client’s needs, including their target audience, goals, and brand identity. Conducting meetings and discussions with the client helps gather essential information and align the design with their objectives.

Concept Development and Brainstorming

Based on the client’s requirements, brainstorming sessions are conducted to generate creative ideas and concepts for the signage design. This stage involves exploring different design approaches, considering various layouts, typography, colors, and graphics.

Sketching and Digital Rendering

Once the concepts are developed, the designer creates rough sketches to visualize the design ideas. These sketches serve as the foundation for creating digital renderings using design software. Digital rendering allows for more precise detailing, color exploration, and presentation to the client for feedback.

Material Selection

Selecting the appropriate materials is crucial to ensure the signage’s durability, visibility, and overall aesthetic appeal. Factors such as weather conditions, location, and budget influence the material selection. Common signage materials include acrylic, metal, vinyl, and LED.

Mock-up Creation

After finalizing the design concept and materials, a mock-up or prototype of the signage is created. This step provides a tangible representation of how the final signage will look and allows for further refinements before proceeding to production.

Finalizing the Design

Once the mock-up is approved, the final design is prepared, including the precise measurements, color codes, typography, and any additional specifications required for production. The design files are then shared with the signage manufacturing team for implementation.

Signage Installation

Proper installation is critical to ensure the signage is securely placed, visible, and aligned with the design intent. The installation process involves the following steps:

Pre-installation Preparations

Before installation, the installation team conducts site surveys to assess the location, identify any obstacles or challenges, and determine the necessary equipment and tools.

Location and Positioning Considerations

The signage’s visibility and impact depend on its placement and positioning. Factors such as viewing angles, distance, lighting conditions, and surrounding structures need to be considered when determining the optimal location.

Installation Techniques and Tools

Installation techniques vary depending on the signage type, size, and mounting requirements. Common installation methods include screw mounting, adhesive mounting, hanging, or freestanding structures. The installation team uses specialized tools and equipment to ensure precision and accuracy during the installation process.

Quality Assurance and Testing

After installation, a thorough quality assurance check is conducted to ensure the signage meets the design specifications and is free from any defects or damages. Testing may involve checking visibility, readability, illumination (if applicable), and overall structural integrity.

Importance of Professional Signwriters

While some individuals may attempt to design and install signage themselves, there are several compelling reasons to entrust these tasks to professional signwriters.

Expertise and Experience

Professional signwriters have the knowledge, skills, and experience to create visually appealing and effective signage. They understand design principles, color psychology, typography, and best practices for visibility and legibility. Their expertise ensures that the signage stands out and effectively communicates the intended message.

Compliance with Regulations

Signage design and installation are subject to various regulations and permits. Professional signwriters are well-versed in these regulations and ensure that the signage meets all legal requirements, including size restrictions, safety standards, and accessibility guidelines.

Cost-Effectiveness and Time-Saving

While hiring professional signwriters may involve an upfront cost, it can ultimately save time and money in the long run. Professionals have access to the necessary tools, equipment, and materials, which can be costly to acquire independently. Additionally, their expertise ensures efficient design and installation processes, reducing the risk of errors or rework.

Tips for Effective Signage Design

Creating impactful signage requires careful attention to design details. Here are some tips to enhance the effectiveness of your signage:

  1. Keep it simple and clear: Avoid cluttering the design with excessive information or graphics. Focus on the core message and make it easily readable at a glance.
  2. Choose appropriate colors and fonts: Select colors that align with your brand and ensure high contrast between text and background for optimal visibility. Use legible fonts that reflect your brand personality.
  3. Use high-quality images and graphics: If incorporating visuals, ensure they are of high resolution and relevant to your message. Poor-quality images can diminish the overall impact of the signage.
  4. Consider visibility and legibility: Ensure that your signage is visible from a distance and easily readable. Test the readability in different lighting conditions and viewing angles.
  5. Incorporate branding elements: Use consistent branding elements, such as logos and colors, to reinforce brand identity and increase brand recognition.

Common Mistakes to Avoid in Signage Design

To create effective signage, it’s essential to avoid common mistakes that can diminish its impact. Here are some pitfalls to watch out for:

  1. Overcrowding the design: Too much information or excessive graphics can overwhelm viewers and make the signage difficult to comprehend. Keep the design clean and focused on the key message.
  2. Using inconsistent branding: Inconsistent use of colors, fonts, or logos can create confusion and weaken brand recognition. Maintain consistency across all signage to reinforce brand identity.
  3. Neglecting visibility factors: Poor visibility due to inadequate lighting, small text size, or low contrast can render signage ineffective. Ensure optimal visibility by considering the viewing distance and lighting conditions.
  4. Lack of proper maintenance: Neglecting signage maintenance can lead to deterioration, reducing its effectiveness and lifespan. Regular cleaning, repair, and replacement of damaged components are necessary to maintain a professional appearance.

Conclusion

Signage design and installation are essential components of effective communication and brand promotion. You may contact us in our website. Understanding the fundamentals of signage design, including elements, types, and the design process, empowers businesses and individuals to create visually appealing and impactful signage. By considering tips for effective signage design, avoiding common mistakes, and leveraging the expertise of professional signwriters, you can enhance your brand visibility and make a lasting impression on your target audience.

Advertisement

What is the recommended RPM for buffing a car?

Introduction

Car detailing is the process of thoroughly cleaning and restoring a car to its original condition. One of the key steps in car detailing is buffing, which involves using a buffing machine and polishing pad to remove scratches and other imperfections from the car’s paint. The RPM (revolutions per minute) of the buffing machine is an important factor in achieving a perfect finish. In this article, we’ll explore the best RPM for buffing a car and provide tips and tricks for achieving a flawless finish.

Choosing the Right RPM for Buffing

When choosing the right RPM for buffing, it’s important to consider the type of paint you’re working with. Here are some factors to consider:

  • Hardness of the paint: Harder paints require a higher RPM, while softer paints require a lower RPM to avoid damaging the surface.
  • Age and condition of the paint: Older, more weathered paint may require a lower RPM to avoid damaging the surface.
  • Type of buffing pads: Different pads may require different RPMs for optimal performance.

Here are some recommended RPM ranges for different types of paint:

  • Clearcoat paint: 1500-2500 RPM
  • Single-stage paint: 1200-1800 RPM
  • Soft and delicate paint: 800-1200 RPM

Choosing the Right Polishing Pad

Choosing the right polishing pad is also important for achieving a perfect finish. Here are some common types of polishing pads and their uses:

  • Wool pads: Used for heavy cutting and removing deeper scratches.
  • Foam pads: Used for general polishing and removing light scratches.
  • Microfiber pads: Used for final polishing and removing any remaining imperfections.

When choosing a polishing pad, it’s important to consider the type of paint you’re working with and the level of imperfections you need to remove. Start with a less aggressive pad and work your way up if needed.

Buffing Technique and Safety Tips

Proper buffing technique and safety precautions are essential for achieving a flawless finish and avoiding damage to your car. Here are some tips to keep in mind:

  • Always start with a clean and dry surface.
  • Use a light touch and avoid pressing down too hard on the surface.
  • Keep the buffing machine moving at all times to avoid overheating the surface.
  • Use a slow and steady motion, working in small sections at a time.
  • Wear protective gear such as gloves, eye protection, and a dust mask.

Correcting Swirl Marks with Buffing

Swirl marks are a common imperfection in car paint and can be corrected with proper buffing technique. Here’s how:

  • Start with a less aggressive pad and lower RPM.
  • Apply a small amount of polish to the pad and work it into the surface in a circular motion.
  • Increase the RPM and apply more pressure as needed.
  • Wipe away any excess polish with a microfiber towel.
  • Repeat as necessary until the swirl marks are removed.

Conclusion

Buffing is an important step in car detailing that can help restore your car’s paint to its original condition. By choosing the right RPM and polishing pad, using proper technique and safety precautions, and correcting swirl marks as needed, you can achieve a perfect finish every time. Remember to always take your time and work in small sections to avoid damaging your car paint.